So I have had my A7s for 10 days now. I took it on holiday with me shooting both stills and video, getting a feel for the camera in a wide range of situations from brilliant sunshine to shooting under candlelight.
It has been an absolute delight using it, with one small caveat: No ND filters built in and boy, does this camera need ND filters! I see that there are now some lens adapters with ND faders built in from Fotodiox and HolyManta. I hope to test these soon, but these ND adapters are dumb adapters so only for fully manual lenses. So a set of front of lens ND’s or a good ND fader is essential to get the best from the A7s.
Lens wise I don’t have the greatest range of full frame lenses. I have my Samyang 24, 35 and 85mm full frame primes which work really well with the camera and the Sony 28-70mm f3.5-f5.6 kit lens and some old f1.4 nikkors. Actually the kit lens has really surprised me, for what it is, it does give a nice image. Almost all my lenses are Canon EF mount so I have been using an adapter. The one I have is the Commlite Full frame E to EF smart adapter, which has worked perfectly (it supports a wider range of lenses than my early model metabones adapter). For some longer focal lengths I’ve been playing with the new Tamron 16-300mm APS-C lens. One side note is that if you use an APS-C lens with a 1.4x teleconverter, in most cases the image circle will then fill the full frame sensor. I will be testing this further and posting some sample images soon. This might be handy for 4K video when you really need to use the full sensor.
Anyway, back to the camera. I had forgotten how nice full frame can be to work with. For photo’s the shallow DoF is a delight. For video you have much greater control over your DoF. As the camera is 3200 ISO you can shoot in the dark with ease and get very natural looking images without having to add extra light. SLog2 is great for capturing a huge dynamic range video. Today and tomorrow I am pushing the Slog2 though some torture and exposure tests to find the exposure sweet spot for Slog2 and 8 bit recordings. I’m also developing some LUT’s to use with the camera and I’ll have a full workflow guide to slog2 on the A7s in the next couple of weeks.
I really love that this little camera can shoot video that is of really remarkably good quality. Most people don’t realise your shooting video with it. It’s really quite scary just how good the video is, it’s starts you thinking… do I need an F5 when the video from the A7s is so good? But then when I started to set up the A7s for my Slog2 torture tests and added a monitor, the battery to power the monitor, rods, matte box, external recorder etc it soon turned into a frankenstien monster of a camera rig. The F5 is so much nicer to use in this respect. For casual shooting, covert filming or as a grab camera the A7s is pretty incredible and I will use it for a lot of things, but it’s not a replacement for my F5/R5.
One very nice feature of the A7s is the silent shutter stills mode. In this mode the camera makes use of the sensors electronic shutter rather that the cameras mechanical curtain shutter. This is great for time-lapse as you won’t wear out the mechanical shutter. The only down side is that when I use a DSLR for time-lapse I often make use of the large frame size from a 24MP or more sensor to re-frame or pan and scan the shot in post. The A7s is only 12.2MP or 4,240 x 2,832 pixels so very little room for re-framing in a 4K production, although not too bad for an HD programme. I wish the vanilla A7 had this feature, it would make it a great time-lapse camera. One application I’m very excited about is using the A7s to shoot the northern lights in both time-lapse and real time next year during my Northern Lights expeditions and workshops.
Keep an eye out for my Slog2 guide in the next week or so where I’ll document my findings on how to get the very best from the A7s. It’s an amazing little camera. Can’t wait for the 4K recording options for the camera to become a reality. Maybe we will find out more at IBC.
This trips are always great adventures and we get to see many incredible things from Sun Dogs to the Aurora. In addition there are many activities including Ice Fishing, Campfire cooking, sauna night and conditions permitting Dog Sledding.
As the owner of a Sony AX100, which is a really great little 4K and HD camcorder I wasn’t really all that excited when I saw the first prototype of the X70 at Broadcast Asia back in June. You see in the past Sony have done this many times, taken a high end consumer camcorder, updated the firmware, added a handle and then sold it for a higher price as a pro camcorder. In the past, there has in reality been little difference between the cheaper consumer model and the more expensive pro version.
The handgrip on the Sony PXW-X70
The PXW-X70 is different. This is much more than an AX100 with new firmware. For a start the body of the camera is quite different. The right hand side of the X70 is quite different to the AX100. It has a much fatter hand grip. This makes the camera much easier to hold comfortably for long periods. It also makes space for a full size HDSDI output and a full size HDMI output. But the differences don’t stop there.
On the top of the hand grip there is a large assignable button that is normally set to act as a control for the focus magnification function. This button falls immediately under your index finger when your shooting. In front of this is a new larger and easier to use zoom rocker and then in front of that is another assignable button, this one set as a one push auto iris button – very nice!
The back of the handgrip and the small joystick.
At the back of the handle there is a small joystick that ends up under your thumb (just where it needs to be). This joystick can be used to navigate through the cameras menu system. So, without taking your hand out of the hand grip you can check focus, zoom in and out, set your exposure and go through the menu system. If only it was this easy on all of Sony’s cameras! Ergonomically this camera is really good, especially when you consider how small it is.
The camera has a nice 12x stabilised, optical zoom lens, behind which sits a 1 inch 20 megapixel sensor. In video mode about 14 million pixels are used, so even in 4K (there will be a paid 4K upgrade option next year) there are more pixels than needed for full resolution. Rather than let this extra resolution go to waste you can activate Sony’s “clear image zoom” function that works seamlessly with the optical zoom to give you a 24x zoom range in HD.
Frame grab from PXW-X70. Click on the image to see the full size frame.
The clear image zoom really is remarkably transparent. If you look hard enough at the image, on a big screen, when it’s zoomed all the way in you can just about discern a very slight softness to the image, but frankly I don’t think this is any worse than the softness you might see from a compact optical 24x zoom. It certainly doesn’t look electronic and unless you have side by side, with and without test clips I don’t think you would know that the clear image zoom has been used.
If 24x is not enough there is also a further digital extender, controlled by a button on the right side of the lens that doubles the digital zoom. This you can see, the image is a little degraded at 48x, but it’s not terrible, might be handy for a breaking news story where you can’t get close to the subject.
The left side of the PXW-X70
As well as the optical stabiliser in the lens the camera also has a switchable electronic stabiliser. The active steadyshot is very effective at smoothing out even the shakiest of hands. But it does tend to hang on or grab hold of the image a bit. So when you do deliberately move the camera it tends to try to stabilise the scene until it can no longer correct for the cameras movement at which point the scene is suddenly released and starts to move. If your using a tripod you definitely want to just use the standard steadyshot and not the active mode.
Dual SD card slots on the PXw-X70
The pictures are recorded using either XAVC, AVCHD or standard definition DV to SD cards. For XAVC you must use SDXC cards, but these are cheap and readily available these days. There are two card slots and you can choose between relay record where the camera will switch from slot A to slot B once A is full, or you can make two simultaneous recordings on both cards at the same time. This gives an instant backup if you need it.
XAVC HD RECORDING:
The XAVC HD recordings are 10 bit 422 long GoP at 50Mb/s, 35Mb/s or 25Mb/s. The quality of the 50Mb/s recordings is amazing with no compression artefacts that I can see (there must be some, I just can’t see them). Even the 25Mb/s recordings look really good. You can shoot at up to 60fps in 60i mode and 50fps in 50i mode. In 60i mode you also have 24fps.
Frame grab form the PXW-X70, click on the image to see full size.
Considering this is a highly compact, single chip camera the images it produces are really very good. They don’t have that typical small sensor camera look. The pictures are remarkably noise free at 0db and largely free of artefacts. I tend to find that small handycams often suffer from what I would describe as “busy” pictures. Pictures where perhaps there is a lot of added sharpening or where the pixels are read in special ways to make a sharp picture. This makes edges slightly flickery and gives the pictures a tell tale small sensor look. The X70 with it’s big sensor and abundance of pixels just doesn’t have this “busy” look.
Train sitting in station. Frame grab from PXW-X70
The pictures really look like they come from a pro camera. Occasionally very fine, high contrast details like white text on a black background can look a little busy, but this is very minor. Dynamic range is quite respectable, it’s not as good as a PMW-300, but not too bad for a compact handycam (I estimate about 10 to 11 stops of DR).
One thing I did find with this camera is that because there is so little noise and the codec is so good, you could quite comfortably shoot about a stop darker than you would normally and then just bring the image up a bit in post. Shooting a little darker helps the camera handle bright highlights and then in post you can just bring up the shadows and mid tones with a simple colour correction to give a nice exposure. I wish I had realised this when I shot the demo video. I would have exposed a little on the dark side and then tweaked the shots in post. There’s so little noise at 0db and so few artefacts that the image holds up to this really well. If your using auto exposure you can set an exposure offset to allow for this in the menu.
PXW-X70 without the top handle fitted.
The X70 is pretty sensitive and 9db of gain is quite useable, so shooting indoors in a typical home or at a wedding venue without extra lights should be no problem. Ramp it up to +33db and it see’s better in the dark than I do, but there is a fair bit of noise at +33db.
As well as being generally rather sensitive the PXW-X70 also has a nightshot mode that bypasses the cameras IR filter and includes a switchable infra-red light, so you can shoot in total darkness if you want.
To see what you are shooting there is a 3.5″ LCD panel. This panel is higher resolution than the one on the AX100 and gives a sharp and pretty accurate image. On the back of the camera there is a small OLED viewfinder. This little OLED is pretty good. It has great contrast and is pretty sharp for a small finder. It’s a great feature on bright sunny days when the LCD can become harder to see.
CRISP, SHARP IMAGES:
The HD images are crisp and sharp without any obvious sharpening, almost certainly a result of having a 4K ready sensor. The lack of obvious detail correction helps give the pictures a pleasing, more filmic look. The camera has picture profiles so if you want you can soften or sharpen the images if you choose. As well as detail and aperture controls there are also controls for gamma (standard, still, Cinematone1, Cinematone2, ITU709) and color. The color controls are similar to those on the FS700 where you can adjust the saturation as well as R, G, B, C, M, Y and K brightness. In addition there is a choice of 6 different preset color modes plus black and white.
PXW-X70 auto/manual switch.
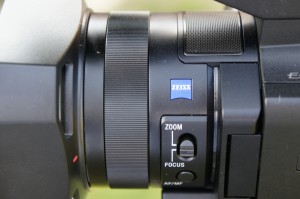
The camera can be controlled either fully automatically or fully manual as well as various in between modes. There is a switch on the back of the camera to switch between auto and manual. In manual you can control the iris, shutter and gain by pressing one of three buttons along the bottom edge of the camera and the using a small wheel just below the lens to set what you have selected. In practice this actually works quite well. There is another button for white balance control on the side of the camera with the usual presets plus auto white balance. Just under the Manual/Auto switch there is a selector for the built in ND filters. I recently purchased a A7s DSLR type camera and I had forgotten what a fiddle it can be to use a camera that doesn’t have built in ND’s. So it’s really good to see proper ND filters on the PXW-X70 as they really help you manage your depth of field.
On the lens there is a single large control ring that can be used to focus the lens or to act as a manual zoom ring. The focus is responsive and although I don’t normally like round and round servo focus rings this one wasn’t too bad.
The zoom/focus ring on the PXW-X70.
There really is so much to this camera that it would take a small book to go through all the features. For example there’s the touch screen LCD that can be used for touch to focus or touch to expose where you just touch the part of the screen you want to expose or focus on. There’s a full set of exposure and focus aids including peaking, histogram, zebras etc.
On the top of the camera you have Sony’s new MI shoe (Multi-Interface) for connecting accessories like the supplied handle with XLR audio inputs. The supplied detachable handle is really well made and very secure when attached. One small note is that by default when you attach the handle to the MI-shoe the camera switches to XLR audio automatically by default. So if you don’t actually have a mic connected to the handle you won’t have any audio as the internal mic gets shut off. You have to go in to the audio section of the menu to enable the internal mic if you want to use the handle but want to use the built in mic.
If you want to do time-lapse or slow stuff down the camera has S&Q motion that goes from 1fps to 60fps at 1920×1080.
The camera has WiFi and NFC and allows remote control via Content Browser Mobile and simply touching an NFC enabled phone or tablet against the side of the camera will pair the camera with the phone or tablet. In the future following a firmware update you will be able to use the camera to stream your content live via U-stream.
Finally – build quality. It’s really well made. It feels nice and solid, it feels like it will really last. Don’t tell Sony, but I dropped the camera from waist hight while I was using it. It survived, no problem at all.
Sony’s new baby XDCAM camcorder, the PXW-X70.
In conclusion: This is a nice little camera. It’s very easy to operate. The picture quality is very good for such a compact camera, the only thing that lets it down just a bit is the highlight handling. But the camera is so clean that you can afford to expose a little lower to compensate for this. Since shooting the demo video I have been playing with the picture profiles to help with the highlight exposure and I found that bringing up the black gamma really helps as it lifts the mid range allowing you to expose slightly lower.
The large sensor, combined with the switchable built in ND filters gives you much greater control over the depth of field than normally possible with a compact handycam.
I think you have to remember that this is a small camera. It isn’t a PXW-X180 and it never will be, but if your budget is tight and you want an easy to use compact camera this could be the one for you. I think it would be a good fit as a “B” camera or for use in lower budget corporate productions. In addition the PXW-X70 would be a good camera to give to PA’s and producers or to hand off to inexperienced shooters for fly-on-the-wall productions.
Here’s a short clip to keep you going until later in the week when I will upload the full length version of my video “Dancers on the line” shot with the new Sony PXW-X70 camcorder. As well as the film there will be a behind the scenes video with some insight into what the camera is like to shoot with and how the images look. It’s all good stuff, this is a great little compact handycam and a pretty big step up from the AX100.
Frame grab from the PXW-X70.
It has a nice big 1″ size sensor, built in ND filters and a nice power zoom lens. It records XAVC long GOP 10bit 422 at 50Mbps at up to 60fps. Also has AVCHD and standard definition DV. The ergonomics are brilliant, clearly Sony have done a lot of works on this area and it a delight to operate run and gun or when your pressed for time. You get great battery life and the pictures are pretty amazing for a compact handycam. You can even dial in your own picture profiles for a custom look. Dual SD card slots allow for relay recording or dual card recording, there’s an full size SDI and HDMI out too. LAst thing for now… it’s 4K ready. There will be a paid upgrade to 4K option in the first half of next year. More details to come as the week progresses.
Here’s the press release from Sony.
Basingstoke, July 29, 2014: Sony has today launched the 4K-ready PXW-X70, the first compact XDCAM professional camcorder ever produced. Expanding the popular file-based XDCAM family to a new smaller form factor and lower price point, Sony has combined stunning picture quality, speed of shooting and robust performance into a package which is ideal for a wide range of applications from news gathering and documentary to events work.??
The PXW-X70 features a 1.0 type Exmor® R CMOS Sensor with a resolution of 20 megapixels. The sensor, which is even larger than the Super 16mm film frame, delivers high resolution and fantastic low light performance, as well as offering more depth of field control as demanded by today’s diverse shooting requirements. The new camcorder has the ability to record High Definition in XAVC Long GOP, enabling 422 10-bit sampling at 50 Mbit/s. This in-turn supports a broadcast-quality workflow, increasingly adopted by productions in many different professional applications.
This addition to the expanding next generation XDCAM family follows the recently announced PXW-X180 and PXW-X160 and builds upon Sony’s successful heritage of compact professional camcorders. The PXW-X70 is the first professional compact camcorder from Sony to include Wi-Fi-enabled control via Smart Phone or Tablet using the Content Browser Mobile application. An upcoming release will also provide customers with the ability to upgrade the PXW-X70 to record in 4K Ultra High Definition, with file transferring, and live video streaming capabilities.
“This first compact member of the XDCAM family brings the performance and workflow benefits associated with XAVC to an even wider range of shooting scenarios,” said Robbie Fleming, Product Marketing Manager, at Sony Professional Solutions Europe. “Over the past couple of years we’ve seen the broadcast industry really embrace the picture quality benefits associated with large sensors; the one-inch sensor at the heart of the PXW-X70 sets a new standard for colour, depth and texture in a professional compact camcorder. Coupled with the ability to upgrade to 4K, this represents a multipurpose, future-proof option for customers looking for a tough camcorder which doesn’t compromise on image.”
Key features of the PXW-X70
• 1.0 type Exmor® R CMOS Sensor and Carl Zeiss Vario Sonnar T* lens for stunning picture quality. High sensitivity and fantastic resolution with 14.2 million effective pixels delivers striking detail and colours, even in low light conditions. The lens offers a 12x Optical Zoom, which can be increased to 24x with Clear Image Zoom while retaining full resolution thanks to Super Resolution Technology. Zoom performance can be doubled at any point with a Digital Extender by up to 48x.
• Compact, lightweight XDCAM camcorder packed with adaptable professional functions. The PXW-X70 weighs less than 1.4kg, including the XLR handle unit, battery (NP-FV70), lens hood and large eye-cup. It offers professional interfaces such as 3G-SDI and HDMI output connectors plus an XLR x 2 handle unit with zoom lever. Other professional features include a manual lens ring that can intuitively control zoom and focus, ergonomic palm grip with large zoom lever, two SD memory card slots for backup, simultaneous and relay recording, and a three-level switchable ND filter.
• Breadth of recording format capabilities. Provides multiple choices depending on application required, including XAVC, AVCHD and DV® file-based recording. When recording in XAVC, the PXW-X70 uses the MXF file format, efficiently compressing full HD (1920 x 1080) resolution using the MPEG-4 AVC/H.264 CODEC. Image sampling is 4:2:2 10-bit with high-efficiency Long-GOP compression at 50 Mbps, 35 Mbps or 25 Mbps.
• Built-in Wi-Fi control functionality for monitoring and remote control versatility. Near Field Communication functions enable easy, one-touch wireless LAN connection to a smartphone or tablet, while the Content Browser Mobile application allows confirmation of shot angles and operation of the camcorder by remote, including field angle setting, spot focus and iris adjustment.
• Upcoming announcements to add even greater, future-proof functionality. Sony is set to make upgrades to 4K and file transfer and streaming by Wi-Fi function available for the PXW-X70 in the coming months.
I’ve been playing with an SLR Magic Anamorphot. This is a high quality lens adapter that allows you to shoot in the 2.35:1 aspect ratio with a conventional 16:9 camera. The adapter screws on to the front of existing lenses and squashes the scene horizontally by 33% as you shoot. Then in post you squash the image vertically by the same amount and the end result is 2.35:1 aspect ratio footage.
There are some limitations and these are covered in the video, so please watch the video for a full explanation as well as some sample footage. For the money it’s a great way to get low cost anamorphic shots. As well as the aspect ratio change you get really nice horizontal blue lens flares giving you that JJ Abrams look to your productions. Really looking forward to trying it on my A7S once that arrives.
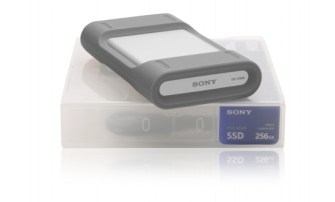
Hard drives are boring! But they are now a very important part of life in the world of TV production. I get through dozens and dozens of hard drives every year and as the drives I am using may hold footage that can never be replaced it’s important that they are as reliable as possible. For a while now I have been using a number of Sony hard drives and SSD’s. These drives are built for portable video applications and my drives have been all over the world from hot, humid Asia to the bitter cold of Arctic Norway. They have never let me down. Each drive comes in a nice case that resembles a video cassette case so that you can stack them neatly on a shelf. No more tatty, crumpling cardboard boxes. In addition the outer case protects the drive in transit, plus each case contains a USB3 lead and a firewire 800 cable, so you don’t need to search around for the cables.
The drives themselves are built in to a tough but very lightweight enclosure with soft rubber bumpers at each end. There are little notches and bumps in the bumpers that interlock if you stack the drives one on top of another, say on the desk of your edit suite. Not only do the rubber bumpers protect the drives from knocks and bumps, but they also incorporate flaps that cover the USB3 and Firewire 800 sockets. The drives meet the MIL-STD-810G standard and when the connector covers are closed are dust proof to IP5X and splash proof to IP4X. The HDD is built to withstand being dropped from 2m and the SSD from 2.3m. I have to say that my 256GB SSD has been dropped a few times now and is still going strong.
Sony are so confident of the quality of their drives that they offer a 3 year warranty and after almost a year on the market, I have been told that so far not one single drive has had to be replaced!
USB3 is backwards compatible with USB2, so if you don’t have USB3 you can just treat the drive as a USB2 drive. If you are a Mac user with an older Mac then you are well catered for with a pair of Firewire 800 ports on the rear of each drive.
The 256GB SSD is extremely fast and this drive has become my go-to drive for on the road use as I can easily edit 4K material stored on this drive and it appears to be really tough. I often ship my SSD along with my hold baggage when I’m flying, it’s been bashed about on snow scooters and used to edit from while bouncing down dirt track roads. I use the 500GB and 1TB Hard drives for general purpose storage and HD editing.
With the UK set to see a couple of days of strong and severe thunderstorms I thought I would put together a very quick guide to shooting lightning with both stills cameras and video cameras. Your first issue will be finding somewhere dry to shoot from, you don’t want rain on your camera or lens. You also do need to consider safety. Lightning is dangerous, it can strike many miles from a thunderstorm. If you can hear thunder you are in the strike risk area, so do take care. One of the safest places to be in a thunderstorm is inside a car. If the car is struck the electricity will pass through the body of the car and not through the occupants, before jumping from the underside of the car to the ground. If you are shooting from a car stay inside the car, don’t sit with your feet out of the door or any part of you touching the ground. Don’t sit in the car while holding on to a camera on a tripod outside the car. Don’t stand under trees, they can explode when struck by lightning, don’t stand on the very top of a hill. Use your common sense.
Long exposure captures great nigh time lightning.
For either stills or video you’re really going to want to use a tripod to get the very best results. As you often get strong winds around thunderstorms you want a good stable tripod. If it is windy keep a close eye on the camera and tripod, you don’t want it blown over by a strong gust of wind.
A wide angle lens will increase your chances of getting a lightning bolt in your shot, but the wider the shot the less detail you will see in the lightning bolt. You can always crop in to a wide shot a bit if it’s too wide. I like to have something in the foreground to give some interest to the image, but try to avoid too many obstructions to the skyline as these will block your view of the lightning.
NIGHT FOCUS:
This is probably the easiest for still photos, but it has many challenges. One is focus as it’s hard to focus on a brief flash of lightning. You will need to use manual focus, autofocus will not work. Start by focussing on a very distant object, perhaps lights on the horizon, the moon, stars or any other VERY distant object, preferably a mile or more away. Then check and double check your focus. Lightning is very fine and if it’s out of focus it will ruin the shot. If you don’t have anything to focus on set the lens to infinity, the sideways “8” symbol is infinity and there will normally be a line to mark the point of infinity focus. Infinity is often NOT at the very end of the lenses focus travel so check for the proper infinity mark. By the way, take a torch/flashlight if your going out in the dark!
STILL PHOTO’s or DSLR AT NIGHT:
You will need to use a tripod. If you have a cable release or other electronic shutter release use it to trigger the camera to prevent shaking the camera as you will need to use a long exposure. As you will be using a long exposure you want to use a low ISO. I typically use 200ISO with an exposure of between 10 and 30 seconds depending on the frequency of the lightning and how bright the surrounding area is. If you are in a town or city with lots of street light you will probably need to use a shorter exposure, maybe 10 to 15 seconds. Out in the countryside you might be able to use 20 to 30 seconds. For the aperture you don’t want super shallow depth of field as this will show up any focus errors, so don’t use your lens wide open. I normally use somewhere around f4 to f8, so f5.6 is probably a good starting point. Take some test shots and check that you are not over exposed.
As a starting point try: 200ISO, f5.6, 10 second exposures, manual focus.
Once the camera is set, it simply a case of snapping away taking pictures until you get lucky and capture one in the frame. It takes a bit of luck and patience, but don’t give up too soon, just keep snapping away. You can just delete all the no good shots later.
Evening thunderstorm in Tucson, Arizona
DAY and NIGHT VIDEO:
If your camcorder has a CMOS sensor (as most do these days) you want to use the slowest shutter speed that you can get away with. If you can control the shutter manually turn it off or reduce it to 1/25 or 1/30. This will reduce the likelihood of you getting lightning bolts that only go half way down the screen, an effect know as “rolling shutter” or “flash band”. If shooting after dark, if you have a camera with full manual control then instead of shooting at the usual 24, 25 or 30 frames per second, consider shooting at half of this, perhaps at 12, 12.5 or 15 frames per second (S&Q motion, slow shutter etc), again with the shutter set to OFF. While this does mean that the motion in your final video will be sped up it almost guarantees that you won’t get any rolling shutter issues. You will need to have the camera on a tripod if doing this to prevent excessive image blur from movement of the camera. The slightly sped up video can also give the pleasing (but fake) impression that the lightning is more frequent than it really is making your shots more dramtic. If you don’t want this simply play the video back at half speed.
STILL PHOTOS DURING THE DAY:
This is really tough unless you have special equipment. You can’t use a long exposure as you would at night because the bright daytime light will wash out the lightning bolts.
Very often a lightning bolt is made up of several flashes in rapid succession. If you do have fast enough reactions and a fast enough camera, you can get the secondary flashes. You will need to use manual focus and manual exposure so there isn’t a delay while the camera thinks about focus and exposure which delays the release of the shutter. Use a tripod with a cable release or remote shutter and use a longish exposure, 1/30th or 1/15th as there can be up to 1/10th of a second delay between flashes and there could be multiple flashes, you don’t want too fast a shutter speed. Set your focus on a very distant object, use a low ISO, again I typically use 100 or 200 ISO. Shoot a couple of test images and set the aperture so that you have a very slightly underexposed shot, may -1EV to -1.5EV, the slightly darker overall image will help the bright lightning show up better. Then it’s just a case of pointing the camera at the storm on a tripod, with your finger on the trigger and try to hit that shutter release as soon as you see any lightning. I find it’s better to not look through the viewfinder, just look in the direction the camera is pointed. You may be lucky, maybe not, a lot will depend on the type of lightning in the storm and your reaction speed. A better way is to use a dedicated lightning trigger such as a Patchmaster: http://www.fotokonijnenberg.nl/patchmaster. This will trigger the camera electronically if it detects any lightning. It’s MUCH faster and can react much quicker than any human, but it still has some lag time so even a lightning trigger won’t capture every bolt.
A final daytime method is to use an adaptation of the night time DSLR method. If you add a strong ND filter a small aperture around f16 and use a low ISO you may be able to get an acceptable long exposure during daytime, perhaps a couple of seconds. Then set the camera to take photo’s continuously (so when you hold the shutter button down the camera will take one photo after another). By locking down a remote shutter release the camera will take a continuous stream of photos with only a very minimal gap between each picture taken. So you have a high likely hood of capturing any lightning bolts, but you will also end up with a lot of pictures that don’t have any lightning in them. You can either discard these empty frames or use all the frames to create a time-lapse video of the storm.
Have fun, stay safe.
If you find the guide useful, please consider buying me a beer or a coffee.
Fed up with carrying large or bulky grey cards that get bent and creased or get dirty and fade? Why not try one of the great Lastolite pop up grey cards? I have the 30cm 18% grey pop-up grey card and it works really well. When folded it’s only about 12cm across so takes no space at all. It comes in a handy zip up case. This is so much easier to carry and transport than traditional ridged cards. The back of the target is 90% white. Both the grey and white targets appear to be very accurate and the matte surface of the grey card helps eliminate hot spots and reflections. There is a cross hair style focussing target in the center of each side if you need to check focus. They come in different sizes, if you want a larger one there are also 50cm and 75cm versions plus there is even an underwater version. Do note that they come in both 18% and 12% shades of grey. Really handy if shooting with SLog or for setting white balance. If you are working with a video camera you want the 18% grey version, but you may need the 12% version if calibrating a light meter etc. Simple, low cost item that works really well. Recommended!
I have just published a major update to my guide to Cine-EI on the PMW-F55 and F5. The guide now goes in to a lot more depth. I have tried to make it easy to understand but it is also quite technical, I have deliberately included the technical background stuff so that hopefully you will understand why Cine-EI and LUT’s work the way they do. I’ve added a whole new section on exposure methods for some of the different LUT’s as well as how to create your own LUT’s.
Please take a look if you use these cameras. Soon I will add a section on post production.
My old Metabones MK1 adapter is not suitable for full frame lenses on the new Sony A7s. So in anticipation of the arrival of my A7s I ordered a cheap CommLite full frame autofocus ready adapter on ebay. This adapter (CN-EF-NEX) was only $90 USD so I thought I would give it a try, much cheaper than the metabones.
To be honest I wasn’t expecting much, but now I have the adapter in my hands I am pleasantly surprised. It appears well made and very solid. It even carries a CE mark. It works just fine on my NEX5N and FS700. On the NEX5N I have working autofocus. If the lens has image stabilisation this works too. I have tried a wide variety of Sigma and Tamron Canon EF lenses with it and they all work. Even my new Tamron 16-300mm works with this adapter, this lens doesn’t work with a number of other adapter.
Autofocus is a little slow, especially if the light is bad. Having not used the MK3 Metabones I don’t know how this compares but certainly this adapter works and is quite useable. It’s said to be compatible with full frame lenses on the A7, but as yet I have not been able to test this. The little mounting post is easily and quickly removable, but a real boon on the NEX5N with bigger lenses. For the price, you can’t go far wrong, really quite impressed considering how little it cost.
Cinematographer and film maker Alister Chapman's Personal Website