Category Archives: Uncategorized

Exposing and Using S-Log2 on the Sony A7s. Part One: Gamma and Exposure.

This document has been prepared independently of Sony. It is based on my own findings having used the camera and tested various exposure levels and methods. LUT’s to accompany this article can be found here.

If you find this useful please consider buying me a coffee or a beer. I’m not paid to write these articles.


Type


One of the really nice features of the Sony A7s is the ability to use different gamma curves and in particular the Sony S-Log2 gamma curve.

What are gamma curves?

All conventional cameras use gamma curves. The gamma curve is there to make the images captured easier to manage by making the file size smaller than it would be without a gamma curve. When TV was first developed the gamma curve in the camera made the signal small enough to be broadcast by a transmitter and then the gamma curve in the TV set (which is the inverse of the one in the camera) expanded the signal back to a normal viewing range. The current standard for broadcast TV is called “Recommendation BT-709”, often shortened to Rec-709. This gamma curve is based on standards developed over 60 years ago and camera technology has advanced a lot since then! Even so, almost every TV and monitor made today is made to the Rec-709 standard or something very similar. Many modern cameras can capture a brightness range, also known as dynamic range, that far exceed the Rec-709 standard.

The limitations of standard gammas.

As gamma effects the dark to light range of the image, it also effects the contrast of the image. Normal television gamma has a limited dynamic range (about 6 to 7 stops) and as a result also has a limited contrast range.

When shooting a high contrast scene with conventional gamma the brightest highlights and the darkest shadows cannot be recorded.
When shooting a high contrast scene with conventional gamma the brightest highlights and the darkest shadows cannot be recorded. The contrast on the TV or monitor will however be correct as the camera captures the same contrast range as the monitor is able to display.

Normally the gamma curve used in the camera is designed to match the gamma curve used by the TV or monitor. This way the contrast range of the camera and the contrast range of the display will be matched. So the contrast on the TV screen will match the contrast of the scene being filmed and the picture will look “normal”. However the limited dynamic range may mean that very bright or very dark objects cannot be accurately reproduced as these may exceed the gammas dynamic range.

Although the dynamic range of Rec-709 may not always capture the entire range of the scene being shot, as the gamma of the camera matches the gamma of the TV the contrast will appear correct.

The over exposure typical of a restricted range gamma such as Rec-709  is commonly seen as bright clouds in the sky becoming white over exposed blobs or bright areas on faces becoming areas of flat white. Objects in shade or shadow areas of the scene are simply too dark to be seen. But between the overexposed areas and any under exposure the contrast looks natural and true to life.

Typical limited Rec-709  exposure range. Contrast is good but the clouds are over exposed and look un-natural.
Typical limited Rec-709 exposure range. Contrast is good but the clouds are over exposed and look un-natural.

Log Gamma.

Log gamma, such as Sony’s S-Log2, allows the camera to capture a much greater brightness range or dynamic range than is possible when shooting with conventional television gamma. Dynamic range is the range from light to dark that the camera can capture or the range that the monitor or TV can display within one image. It is the range from the deepest blacks to the brightest whites that can be captured or shown at the same time.

There are some things that need to be considered before you get too excited about the possibility of capturing this much greater dynamic range. The primary one being that if the camera is set to S-log2 and the TV or monitor is a normal Rec-709 TV (as most are) then there is no way the TV can correctly display the image being captured, the TV just doesn’t have the range to show everything that the camera with it’s high range log gamma can capture accurately.

Fixed Recording Range For Both Standard and Log Gamma.

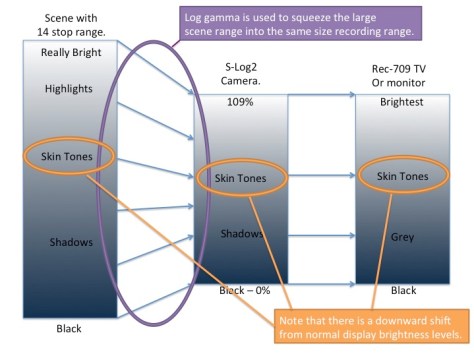
The signal range and signal levels used to record a video signal are normally described in percent. Where black is 0% and the brightest thing that can be recorded is normally recorded at 100% to 109%. Most modern video cameras actually record the brightest objects at 109%. The important thing to remember though is that the recording range is fixed. Even when you change gamma curve the camera is still constrained by the zero to 109% recording range. The recording range does not change whether you are recording Rec-709 or S-log2. So log gamma’s like S-Log2 must squeeze a much bigger signal range into the same recording range as used by conventional Rec-709 recordings.

Log gamma squeezes the scenes large range to fit in the camera's normal 0%-109% recording range.
Log gamma squeezes the scenes large range to fit in the camera’s normal 0%-109% recording range.

Recording S-Log2.

In order to record using S-log2 with the A7s you need to use a picture profile. The picture profiles give you several recording gamma options. For S-log2 you should use Picture Profile 7 which is already set up for S-log2 and S-Gamut by default (for information on gamuts see this article). In addition you should ALWAYS use the cameras native ISO which is 3200 ISO and it is normally preferable to use a preset white balance. Using any other ISO with S-log2 will not allow you to get the full benefit of the full 14 stops of dynamic range that S-log2 can deliver.

Grey Cards and White Cards.

Before I go further let me introduce you to grey and white cards in case you have not come across them before. Don’t panic you don’t have to own one, although I would recommend getting a grey card such as the Lastolite EzyBalance if you don’t have one. But it is useful to understand what they are.

The 90% White Card.

The 90% white card is a card or chart that reflects 90% of the light falling on it. This will be a card that looks very similar in brightness to a piece of ordinary white paper, it should be pure white, some printer papers are bleached or coloured very slightly blue to make them appear “brilliant white”  (as you will see later in many cases it is possible to use an ordinary piece of white paper in place of a 90% white card for exposure).

The Grey Card.

The 18% grey card, also often called “middle grey” card, is a card that reflects 18% of the light falling on it. Obviously it will appear much darker than the white card. Visually to us humans an 18% grey card appears to be half way between white and black, hence it’s other name, “middle grey”.

Middle grey is important because the average brightness level of most typical scenes tends to be around the middle grey brightness value. Another key thing about middle grey is that because it falls in the middle of our exposure range it makes it a very handy reference level when measuring exposure as it is less likely to be effected by highlight compression than a 90% white card.

Exposing White and Middle Grey.

Coming back to Rec-709 and conventional TV’s and monitors. If we want a piece of white paper to look bright and white on a TV we would record it and then show it at somewhere around 85% to 95% of the screens full brightness range. This doesn’t leave much room for things brighter than a white piece of paper! Things like clouds in the sky, a shiny car, a bright window or a direct light source such as a lamp or other light.  In order to make it possible for S-log2 to record a much greater dynamic range the recording level for white and mid tones is shifted down. Instead of recording white at 85%-95%, when using S-log2 it is recommended by Sony that white is recorded at just 59%. Middle grey moves down too, instead of being recorded at 41%-42% (the normal level for Rec-709) it’s recorded at just 32%. By recording everything lower this means that there is a lot of extra space above white to record all those bright highlights in any scene that would be impossible to record with conventional gammas.

To make room for the extra dynamic range and the ability to record very bright objects, white and mid tones are shifted down in level.
To make room for the extra dynamic range and the ability to record very bright objects, white and mid tones are shifted down in level by the S-log2 gamma curve. As a result, white, mid tones etc will be displayed darker than normally expected with conventional gamma.

As S-Log2 normally shifts a lot of the recording levels downwards, if we show a scene shot with S-Log2 that has been exposed correctly on a conventional Rec-709 TV or monitor it will look dark due to the lower recording levels. In addition it will look flat with very low contrast as we are now squeezing a much bigger dynamic range into the limited Rec-709 display range.

The on screen contrast appears reduced as the capture contrast is greater than the display contrast.

This on screen reduction in contrast and the darker levels are actually perfectly normal when shooting using log gamma, this is how it is supposed to look on a normal monitor or TV. So don’t be alarmed if when shooting using S-Log2 your images look a little darker and flatter than perhaps you are used to when shooting with a standard gamma. You will adjust the S-Log2 footage in post production to restore the brightness and contrast later.

Correctly exposed S-Log2 can look dark and washed out.

The post production adjustment of S-Log2 is very important and one of the keys to getting the very best finished images. The S-Log2 recording acts as a digital negative and by “processing” this digital negative in post production (normally referred to as “grading”) we manipulate the large 14 stop dynamic range of the captured image to fit within the limited display range of a Rec-709 TV in a pleasing manner. This may mean pulling up the mid range a bit, pulling down the highlights and bit and generally shifting the brightness and colour levels of different parts of the image around  (see PART 2 for more post production information).

SLog-2 and 10 bit or 8 bit data.

Originally Slog-2 was designed for use on high end digital cinema cameras such as Sony’s F65 camera. These cameras have the ability to record using 10 bit data. A 10 bit recording can have up to around 1000 shades of grey from black to white. The A7s however uses 8 bit recording which only has a maximum of 235 shades from black to white. Normally 8 bit recording is perfectly OK as most transmission and display standards are also 8 bit. Shoot with an 8 bit camera and then display that image directly via an 8 bit system and nothing is lost. However when you start to grade and manipulate the image the difference between 8 bit and 10 bit becomes more significant. If you start to shift levels around, perhaps stretching out some parts of the image then the increased tonal resolution of a 10 bit recording helps maintain the very highest image quality. Photographers that have shot using both jpeg and raw will know how much more flexibility the 12 bit (or more) raw files have compared to the 8 bit jpeg’s. However they will also know that 8 bit jpeg’s can be also adjusted, provided you don’t need to make very large adjustments.

Contrary to popular belief heavy grading 8 bit footage does not necessarily lead to banding in footage across smooth surfaces except in extreme cases. Banding is more commonly a result of compression artefacts such as macro blocking. This is especially common with very highly compressed codecs such as AVCHD. The 50Mbps XAVC-S codec used in the A7s is a very good codec, far superior to AVCHD and as a result compression artefacts are significantly reduced, so banding will be less of an issue than with other lower quality codecs. If your going to shoot using S-Log2, some grading will be necessary and as we only have 8 bit recordings we must take care to expose our material in such a way as to minimise how far we will need to push and pull the material.

Getting Your Exposure Right.

When S-Log2 was developed the engineers at Sony produced tables that specified the correct exposure levels for s-Log2 which are:

exposure table1As you can see the nominal “correct” exposure for S-Log2 is a lot lower than the levels used for display on a typical Rec-709 TV or monitor. This is why correctly exposed s-log2 looks dark on a conventional TV. The implication of this is that when you grade your footage in post production you will have to shift the S-log2 levels up quite a long way. This may not be ideal with an 8 bit codec, so I decided to carefully test this to determine the optimum exposure level for the A7s.

Correct Exposure.

The panel of images below is from the A7s recording S-log2 and exposed at the Sony recommended “correct” 32% middle grey level. The correct exposure was determined using a grey card and an external waveform monitor connected to the cameras HDMI output. Then the S-log2 was corrected in post production to normal Rec-709 levels using a Look Up Table (LUT – more on LUT’s in part 2). You can also see the viewfinder display from the camera. If you click on the image below you can expand it to full size. Sorry about the shadow from the laundry line, I didn’t see this when I was shooting the test shots!

Correctly exposed S-Log2 from A7s.

From this you can see just how dark and low contrast looking the original correctly exposed S-log2 is and how much more vibrant the corrected Rec-709 image is. I have also indicated where on the cameras histogram middle grey and white are. Note how much space there is to the right of white on the histogram. This is where the extra highlight or over exposure range of S-log2 can be recorded. When correctly exposed S-log2 has an exposure range of 6 stops above middle grey and 8 stops under.

Over Exposing or “Pushing” S-log2.

If we deliberately raise the exposure level above the Sony recommended levels (known as pushing the exposure), assuming you grade the image to the same final levels some interesting things happen.

For each stop we raise the exposure level you will have 1 stop (which is the same as 6db) less noise. So the final images will have half as much noise for each stop up you go. This is a result of exposing the image brighter and as a result not needing to raise the levels in post as far as you would if exposed at the normal level.

You will loose one stop of over exposure headroom, but gain one stop of under exposure headroom.

Bright highlights will be moved upwards into the most compressed part of the log gamma curve. This can result in a loss of texture in highlights.

Skin tones and mid tones move closer to normal Rec-709 levels, so less manipulation is need for this part of the image in post production.

This last point is important for the A7s with it’s 8 bit codec, so this is the area I looked at most closely. What happens to skin tones and textures when we raise the exposure?

Exposing at +1, +2 and +3 Stops.

Below are another 3 panels from the A7s, shot at +1 stop, +2 stops and +3 stops. Again you can click on the images if you wish to view them full size.

A7s S-Log2 over exposed by one stop.
A7s S-Log2 over exposed by 2 stops.
A7s S-Log2 over exposed by 3 stops.

Looking at these results closely you can see that when you increase the exposure by 1 stop over the Sony specified correct level for S-log2 there is a very useful reduction in noise, not that the A7s is particularly noisy to start with, but you do get a noticeably cleaner image.

Below are 4 crops from the same images, after grading. I really recommend you view these images full size on a good quality monitor. Click on the image to view larger or full size.

Crops at different exposure of LUT corrected A7s S-log2 footage.

The noise reduction at higher exposures compared to the base exposure is very clear to see if you look at the black edge of the colour checker chart (the coloured squares), although the difference between +2 and +3 stops is very small. You can also see further into the shadows in the +3 stop image compared to the base exposure. A more subtle but important effect is that as the exposure goes up the visible texture of the wooden clothes peg decreases. The grain can be clearly seen at the base level but by +3 stops it has vanished. This is caused by the highlights creeping into the more compressed part of the log gamma curve. The same thing is happening to the skin tones in the +3 stop image, there is some reduction of the most subtle textures.

From this we can see that for mid tones and skin tones you can afford to expose between 1 and 2 stops above the Sony recommended base level. More than 2 stops over and brighter skin tones and any other brighter textures start to be lost. The noise reduction gain by shooting between one and 2 stops over is certainly beneficial. The down side to this though is that we are reducing the over amount of exposure headroom.

As you raise the exposure level you reduce the over  exposure headroom.
As you raise the exposure level you reduce the over exposure headroom.

Given everything I have seen with this 8 bit camera my recommendation is to shoot between the Sony recommended base S-log2 level and up to two stops over this level. I would try to avoid shooting more than 2 stops over as this is where you will start to see some loss of texture in brighter skin tones and brighter textures.  Exactly where you set your exposure will depend on the highlights in the scene. If you are shooting a very bright scene you will possibly need to shoot at the Sony recommended level to get the very best over exposure headroom. If you are able to expose higher without compromising any highlights then you should aim to be up to 2 stops over base.

Determining The Correct Exposure.

The challenge of course is determining where your exposure actually is. Fortunately as we have seen, provided you in the right ball park, S-log2 is quite forgiving, so if you are a little bit over exposed it’s probably not going to hurt your images much. If you have a waveform monitor then you can use that to set your exposure according to the table below. If you don’t have proper white or grey cards you can use a piece of normal white paper. Although slightly less accurate this will get you very close to where you want to be. Do note that white paper tends to be a little brighter than a dedicated 90% reflectivity white card. If you don’t have any white paper then you can use skin tones, again a bit less accurate but you should end up in the right zone.

My suggested exposure levels for the Sony A7s. The "sweet spot" is from normal to +2 over.
My suggested exposure levels for the Sony A7s. The “sweet spot” is from normal to +2 over.

If you don’t have an external waveform monitor then you do still have some good options. Sadly although the camera does have zebras, these are not terribly useful for S-log2 as the lowest the zebras can go is 70%.

Light Meter: You could use a conventional photography light meter. If you do choose to use a light meter I would recommend checking the calibration of the light meter against the camera first.

Mark 1 Eyeball: You could simply eyeball the exposure looking at the viewfinder or rear screen but this is tricky when the image is very flat.

In Camera Metering: The cameras built in metering system, like the majority of DSLR’s is calibrated for middle grey. By default the camera uses multi-point metering to measure the average brightness of several points across the scene to determine the scenes average brightness and from there set the correct base S-log2 exposure.

Auto Exposure:

When you are using S-Log2, auto exposure in most cases will be very close to the correct base exposure if you use the default Multi-Zone exposure metering. The camera will take an average exposure reading for the scene and automatically adjust the exposure to the Sony recommended 32% middle grey exposure level based on this average. In the P, A and S modes you can then use the exposure compensation dial to offset the exposure should you wish. My recommendation would be to add +1 or +2 stops via the dial. Then observe the histogram to ensure that you don’t have any significant over exposure. If you do then reduce the exposure compensation. Lots of peaks to the far right of the histogram is an indication of over exposure.

Manual Exposure And Internal Metering.

If you are exposing manually you will see a small M.M. indication at the bottom of the LCD display with a +/- number. In the eyepiece viewfinder this appears as a scale that runs from -5 to +5, in S-log2 only the -2 to +2 part of the scale is used. In both cases this is how far the camera thinks you are away from the optimum exposure. + meaning the camera is over exposed, – meaning under.

A7s Viewfinder indications in manual exposure mode showing both M.M. offset from metered exposure and histogram.

In the image above we can see the M.M. indication is +0.3, in the eyepiece you would see a small arrow one bar to the right of “0” , indicating the cameras multi zone metering thinks the shot is just a little over exposed, even though the shot has been carefully exposed using a grey card and external waveform monitor. This error is probably due to the large amount of white in the shot, white shirt, white card, test charts with a lot of brighter than grey shades.  In practice an error of 0.3 of a stop is not going to cause any real issues, so even if this was exposed by setting  the exposure so that you have “M.M. 0.0” the exposure would be accurate enough. But it shows that multi point exposure averaging is easily confused.

The scene above is a fairly normal scene, not excessively bright, not particularly dark. If shooting a snow scene for example the cameras multi point averaging would almost certainly result in an under exposed shot as the camera attempts to bring the bright snow in the scene down to the average middle grey level. If shooting a well lit face against a very dark background then the averaging might try to bring the background up and the shot may end up overexposed.

If you want really accurate exposure then you should put the cameras metering system into the spot metering mode where instead of taking an average of various points across the scene the camera will just measure the exposure at the very center of the image.

A7s Spot Metering Mode.

You can then use a grey card to very accurately set the exposure. Simply place the circular shaped symbol at the center of the viewfinder display over a grey card and set the exposure so that M.M is 0.0 for the correct S-Log2 base exposure. To expose 1 stop over with a grey card, set M.M. +1.0 and two stops over M.M. +2.0 (not flashing, flashing indicates more than +2 stops).

Using Spot Metering to set exposure correctly for S-log2. MM 0.0.

One small issue with this is that the camera will only display a M.M. range of -2.0 to +2.0 stops. Provided you don’t want to go more than 2 stops over base then you will be fine with a grey card.

Using White Instead of Grey:

If you don’t have a grey card then you can use a 90% reflectivity white target. As white is 2 stops brighter than middle grey when S-Log2 is correctly exposed the 90% white should indicate M.M +2.0.

Using spot metering to set the correct exposure for S-Log2. M.M should read M.M +2.0 for a 90% reflectivity white target.

Once you have established the correct exposure you can then open the iris by 1 or two stops to increase the exposure. Or halve the shutter speed to gain a one stop brighter exposure. Each time you halve the shutter speed your exposure becomes one stop brighter, so divide the shutter speed by 4 to gain a 2 stop increase in exposure. As always you should observe the histogram to check for any over exposure. White peaks at the far right of the histogram or disappearing completely off the right of the histogram is an indication of over-exposure. In this case reduce your exposure back down towards the base exposure level (M.M 0.0 with a a grey card).

Exposure Summary:

I recommend using an exposure between the “correct” base S-Log2 exposure level of middle grey at 32% and two stops over this. I would not recommend going more than 2 stops over over base.

In the P, A and S auto exposure modes, when using the default multi-zone metering the camera will set the base S-log2 exposure based on the average scene brightness. For most typical scenes this average should be very close to middle grey. This exposure can then be increased (brightened) by up to 2 stops using the exposure compensation dial.

In manual exposure the “M.M.” number displayed at the bottom of the viewfinder display is how far you are from the correct base S-log2 exposure. M.M. +2.0 indicates +2 stops over base. If using multi zone metering (the cameras default) this exposure will be based on the scenes average brightness.

If you set the metering to “Spot” you can use a grey card centred in the image to determine the correct base exposure and up to 2 stops of over exposure via the M.M. indication when shooting manually.

In Part 2:

In part two I will take a look at grading the S-log2 from the A7s and how to get the very best from the S-log2 images by using Look Up Tables (LUT’s).

I welcome feedback on my articles. If you have any feedback please let me know. I will make this available as a PDF for download once part 2 is completed.

Set of 20 Cube LUT’s for the Sony A7S.

I’ve been doing a lot of work on shooting SLog-2 with the A7s. I realised almost straight away that a set of LUT’s for this camera would really help speed up my grading and testing. In addition as the camera is only 8 bit I have found that I am actually getting the best results from the Slog-2 if I over expose it just a little bit, depending of course on the scene. So I created a set of LUT’s that includes compensation for shooting at the nominal correct exposure as well as either 1 or 2 stops over exposed. In all there are 20 LUT’s in two sets. One is Rec-709 based LUT’s and the other Filmic LUT’s to act as starting points for further grading.

I am in the process of creating the complete workflow and SLog-2 guide for the A7s which I should be publishing later next week which will have much more information on how to use these LUT’s. But in the mean time here are the LUT’s if anyone want’s to play (and I would like feedback on what you think of them).

The LUT naming goes something like this:

AC A7S  709(800) ZERO

AC  (That’s me!).    A7S (The Camera).

709(800) = Output gamma or style.     ZERO = Exposure off set.

The exposure offset refers to the number of stops the footage is over exposed by relative to the normal SLog2 exposure level of Middle Grey at 32% and 90% white at 59%. ZERO menas no exposure offset. 1STOP would be used when the SLog2 was exposed 1STOP over and in this case the LUT then shifts the exposure back down 1 stop to compensate.

709 = Vanilla Rec-709, very contrasty, but limited highlight response and hard clip of over exposure.

709(800) = Rec-709 gamma with 800% (high) dynamic range. Will be slightly low contrast but deals much better with over exposure or bright highlights than vanilla 709.

Film-Like1 = An extended range gamma with highlight roll off (+400% range), slightly de-saturated, slightly more film like color (small red/yellow removed).

Filmic2 = Extended range low contrast gamma with very good over exposure handling. Slightly de-saturated. Good grading start point.

Filmic3 = Similar to Filmic2 but a little more contrast at the expense of a little less highlight roll off.

Click on the links below to download the LUT sets. PLEASE DO NOT HOST THESE ELSEWHERE OR DISTRIBUTE THESE ELSEWHERE OR VIA ANY MEANS OTHER THAN A LINK TO THIS PAGE.

Alisters A7S 709 LUTS v2

Alisters A7S Filmic LUTS set1
If you find the LUT’S useful, please consider buying me a beer or a coffee.


Type


10 days with the A7s. I LOVE this camera!

So I have had my A7s for 10 days now. I took it on holiday with me shooting both stills and video, getting a feel for the camera in a wide range of situations from brilliant sunshine to shooting under candlelight.

It has been an absolute delight using it, with one small caveat: No ND filters built in and boy, does this camera need ND filters! I see that there are now some lens adapters with ND faders built in from Fotodiox and HolyManta. I hope to test these soon, but these ND  adapters are dumb adapters so only for fully manual lenses. So a set of front of lens ND’s or a good ND fader is essential to get the best from the A7s.

Lens wise I don’t have the greatest range of full frame lenses. I have my Samyang 24, 35 and 85mm full frame primes which work really well with the camera and the Sony 28-70mm f3.5-f5.6 kit lens and some old f1.4 nikkors. Actually the kit lens has really surprised me, for what it is, it does give a nice image. Almost all my lenses are Canon EF mount so I have been using an adapter. The one I have is the Commlite Full frame E to EF smart adapter, which has worked perfectly (it supports a wider range of lenses than my early model metabones adapter). For some longer focal lengths I’ve been playing with the new Tamron 16-300mm APS-C lens. One side note is that if you use an APS-C lens with a 1.4x teleconverter, in most cases the image circle will then fill the full frame sensor. I will be testing this further and posting some sample images soon. This might be handy for 4K video when you really need to use the full sensor.

Anyway, back to the camera. I had forgotten how nice full frame can be to work with. For photo’s the shallow DoF is a delight. For video you have much greater control over your DoF. As the camera is 3200 ISO you can shoot in the dark with ease and get very natural looking images without having to add extra light. SLog2 is great for capturing a huge dynamic range video. Today and tomorrow I am pushing the Slog2 though some torture and exposure tests to find the exposure sweet spot for Slog2 and 8 bit recordings. I’m also developing some LUT’s to use with the camera and I’ll have a full workflow guide to slog2 on the A7s in the next couple of weeks.

I really love that this little camera can shoot video that is of really remarkably good quality. Most people don’t realise your shooting video with it. It’s really quite scary just how good the video is, it’s starts you thinking… do I need an F5 when the video from the A7s is so good? But then when I started to set up the A7s for my Slog2 torture tests and added a monitor, the battery to power the monitor, rods, matte box, external recorder etc it soon turned into a frankenstien monster of a camera rig. The F5 is so much nicer to use in this respect. For casual shooting, covert filming or as a grab camera the A7s is pretty incredible and I will use it for a lot of things, but it’s not a replacement for my F5/R5.

One very nice feature of the A7s is the silent shutter stills mode. In this mode the camera makes use of the sensors electronic shutter rather that the cameras mechanical curtain shutter. This is great for time-lapse as you won’t wear out the mechanical shutter. The only down side is that when I use a DSLR for time-lapse I often make use of the large frame size from a 24MP or more sensor to re-frame or pan and scan the shot in post. The A7s is only 12.2MP or 4,240 x 2,832 pixels so very little room for re-framing in a 4K production, although not too bad for an HD programme. I wish the vanilla A7 had this feature, it would make it a great time-lapse camera. One application I’m very excited about is using the A7s to shoot the northern lights in both time-lapse and real time next year during my Northern Lights expeditions and workshops.

Keep an eye out for my Slog2 guide in the next week or so where I’ll document my findings on how to get the very best from the A7s. It’s an amazing little camera. Can’t wait for the 4K recording options for the camera to become a reality. Maybe we will find out more at IBC.


Northern Lights Expeditions for 2015.

More Aurora from 8th Feb.

Just a quick note to say that I have now set the dates for my end of January 2015 Northern Lights trips. Full details can be found here: http://www.xdcam-user.com/northern-lights-expeditions-to-norway/

This trips are always great adventures and we get to see many incredible things from Sun Dogs to the Aurora. In addition there are many activities including Ice Fishing, Campfire cooking, sauna night and conditions permitting Dog Sledding.


The Sony PXW-X70. Sometimes good things come in small packages!

The new Sony PXW-X70 XDCAM camcorder.

Initial Thoughts.

As the owner of a Sony AX100, which is a really great little 4K and HD camcorder I wasn’t really all that excited when I saw the first prototype of the X70 at Broadcast Asia back in June. You see in the past Sony have done this many times, taken a high end consumer camcorder, updated the firmware, added a handle and then sold it for a higher price as a pro camcorder.  In the past, there has in reality been little difference between the cheaper consumer model and the more expensive pro version.

The handgrip on the Sony PXW-X70

The PXW-X70 is different. This is much more than an AX100 with new firmware. For a start the body of the camera is quite different. The right hand side of the X70 is quite different to the AX100. It has a much fatter hand grip. This makes the camera much easier to hold comfortably for long periods. It also makes space for a full size HDSDI output and a full size HDMI output. But the differences don’t stop there.

On the top of the hand grip there is a large assignable button that is normally set to act as a control for the focus magnification function. This button falls immediately under your index finger when your shooting. In front of this is a new larger and easier to use zoom rocker and then in front of that is another assignable button, this one set as a one push auto iris button – very nice!

The back of the handgrip and the small joystick.

At the back of the handle there is a small joystick that ends up under your thumb (just where it needs to be). This joystick can be used to navigate through the cameras menu system. So, without taking your hand out of the hand grip you can check focus, zoom in and out, set your exposure and go through the menu system. If only it was this easy on all of Sony’s cameras! Ergonomically this camera is really good, especially when you consider how small it is.

The camera has a nice 12x stabilised, optical zoom lens, behind which sits a 1 inch 20 megapixel sensor. In video mode about 14 million pixels are used, so even in 4K (there will be a paid 4K upgrade option next year) there are more pixels than needed for full resolution. Rather than let this extra resolution go to waste you can activate Sony’s “clear image zoom” function that works seamlessly with the optical zoom to give you a 24x zoom range in HD.

Frame grab from PXW-X70. Click on the image to see the full size frame.

The clear image zoom really is remarkably transparent. If you look hard enough at the image, on a big screen, when it’s zoomed all the way in you can just about discern a very slight softness to the image, but frankly I don’t think this is any worse than the softness you might see from a compact optical 24x zoom. It certainly doesn’t look electronic and unless you have side by side, with and without test clips I don’t think you would know that the clear image zoom has been used.

If 24x is not enough there is also a further digital extender, controlled by a button on the right side of the lens that doubles the digital zoom. This you can see, the image is a little degraded at 48x, but it’s not terrible, might be handy for a breaking news story where you can’t get close to the subject.

The left side of the PXW-X70

As well as the optical stabiliser in the lens the camera also has a switchable electronic stabiliser. The active steadyshot is very effective at smoothing out even the shakiest of hands. But it does tend to hang on or grab hold of the image a bit. So when you do deliberately move the camera it tends to try to stabilise the scene until it can no longer correct for the cameras movement at which point the scene is suddenly released and starts to move. If your using a tripod you definitely want to just use the standard steadyshot and not the active mode.

Dual SD card slots on the PXw-X70

The pictures are recorded using either XAVC, AVCHD or standard definition DV to SD cards. For XAVC you must use SDXC cards, but these are cheap and readily available these days. There are two card slots and you can choose between relay record where the camera will switch from slot A to slot B once A is full, or you can make two simultaneous recordings on both cards at the same time. This gives an instant backup if you need it.

XAVC HD RECORDING:

The XAVC HD recordings are 10 bit 422 long GoP at 50Mb/s, 35Mb/s or 25Mb/s. The quality of the 50Mb/s recordings is amazing with no compression artefacts that I can see (there must be some, I just can’t see them). Even the 25Mb/s recordings look really good. You can shoot at up to 60fps in 60i mode and 50fps in 50i mode. In 60i mode you also have 24fps.

Frame grab form the PXW-X70, click on the image to see full size.

Considering this is a highly compact, single chip camera the images it produces are really very good. They don’t have that typical small sensor camera look. The pictures are remarkably noise free at 0db and largely free of artefacts. I tend to find that small handycams often suffer from what I would describe as “busy” pictures. Pictures where  perhaps there is a lot of added sharpening or where the pixels are read in special ways to make a sharp picture. This makes edges slightly flickery and gives the pictures a tell tale small sensor look. The X70 with it’s big sensor and abundance of pixels just doesn’t have this “busy” look.

Train sitting in station. Frame grab from PXW-X70

The pictures really look like they come from a pro camera. Occasionally very fine, high contrast details like white text on a black background can look a little busy, but this is very minor. Dynamic range is quite respectable, it’s not as good as a PMW-300, but not too bad for a compact handycam (I estimate about 10 to 11 stops of DR).

One thing I did find with this camera is that because there is so little noise and the codec is so good, you could quite comfortably shoot about a stop darker than you would normally and then just bring the image up a bit in post. Shooting a little darker helps the camera handle bright highlights and then in post you can just bring up the shadows and mid tones with a simple colour correction to give a nice exposure. I wish I had realised this when I shot the demo video. I would have exposed a little on the dark side and then tweaked the shots in post. There’s so little noise at 0db and so few artefacts that the image holds up to this really well. If your using auto exposure you can set an exposure offset to allow for this in the menu.

PXW-X70 without the top handle fitted.

The X70 is pretty sensitive and 9db of gain is quite useable, so shooting indoors in a typical home or at a wedding venue without extra lights should be no problem. Ramp it up to +33db and it see’s better in the dark than I do, but there is a fair bit of noise at +33db.

As well as being generally rather sensitive the PXW-X70 also has a nightshot mode that bypasses the cameras IR filter and includes a switchable infra-red light, so you can shoot in total darkness if you want.

To see what you are shooting there is a 3.5″ LCD panel. This panel is higher resolution than the one on the AX100 and gives a sharp and pretty accurate image. On the back of the camera there is a small OLED viewfinder. This little OLED is pretty good. It has great contrast and is pretty sharp for a small finder. It’s a great feature on bright sunny days when the LCD can become harder to see.

CRISP, SHARP IMAGES:

The HD images are crisp and sharp without any obvious sharpening, almost certainly a result of having a 4K ready sensor. The lack of obvious detail correction helps give the pictures a pleasing, more filmic look. The camera has picture profiles so if you want you can soften or sharpen the images if you choose. As well as detail and aperture controls there are also controls for gamma (standard, still, Cinematone1, Cinematone2, ITU709) and color. The color controls are similar to those on the FS700 where you can adjust the saturation as well as R, G, B, C, M, Y and K brightness. In addition there is a choice of 6 different preset color modes plus black and white.

PXW-X70 auto/manual switch.

The camera can be controlled either fully automatically or fully manual as well as various in between modes. There is a switch on the back of the camera to switch between auto and manual. In manual you can control the iris, shutter and gain by pressing one of three buttons along the bottom edge of the camera and the using a small wheel just below the lens to set what you have selected. In practice this actually works quite well. There is another button for white balance control on the side of the camera with the usual presets plus auto white balance. Just under the Manual/Auto switch there is a selector for the built in ND filters. I recently purchased a A7s DSLR type camera and I had forgotten what a fiddle it can be to use a camera that doesn’t have built in ND’s. So it’s really good to see proper ND filters on the PXW-X70 as they really help you manage your depth of field.

On the lens there is a single large control ring that can be used to focus the lens or to act as a manual zoom ring. The focus is responsive and although I don’t normally like round and round servo focus rings this one wasn’t too bad.

The zoom/focus ring on the PXW-X70.

There really is so much to this camera that it would take a small book to go through all the features. For example there’s the touch screen LCD that can be used for touch to focus or touch to expose where you just touch the part of the screen you want to expose or focus on. There’s a full set of exposure and focus aids including peaking, histogram, zebras etc.

On the top of the camera you have Sony’s new MI shoe (Multi-Interface) for connecting accessories like the supplied handle with XLR audio inputs. The supplied detachable handle is really well made and very secure when attached. One small note is that by default when you attach the handle to the MI-shoe the camera switches to XLR audio automatically by default. So if you don’t actually have a mic connected to the handle you won’t have any audio as the internal mic gets shut off. You have to go in to the audio section of the menu to enable the internal mic if you want to use the handle but want to use the built in mic.

If you want to do time-lapse or slow stuff down the camera has S&Q motion that goes from 1fps to 60fps at 1920×1080.

The camera has WiFi and NFC and allows remote control via Content Browser Mobile and simply touching an NFC enabled phone or tablet against the side of the camera will pair the camera with the phone or tablet. In the future following a firmware update you will be able to use the camera to stream your content live via U-stream.

Finally – build quality. It’s really well made. It feels nice and solid, it feels like it will really last. Don’t tell Sony, but I dropped the camera from waist hight while I was using it. It survived, no problem at all.

Sony's new baby XDCAM camcorder, the PXW-X70.
Sony’s new baby XDCAM camcorder, the PXW-X70.

In conclusion: This is a nice little camera. It’s very easy to operate. The picture quality is very good for such a compact camera, the only thing that lets it down just a bit is the highlight handling. But the camera is so clean that you can afford to expose a little lower to compensate for this. Since shooting the demo video I have been playing with the picture profiles to help with the highlight exposure and I found that bringing up the black gamma really helps as it lifts the mid range allowing you to expose slightly lower.

The large sensor, combined with the switchable built in ND filters gives you much greater control over the depth of field than normally possible with a compact handycam.

I think you have to remember that this is a small camera. It isn’t a PXW-X180 and it never will be, but if your budget is tight and you want an easy to use compact camera this could be the one for you. I think it would be a good fit as a “B” camera or for use in lower budget corporate productions. In addition the PXW-X70 would be a good camera to give to PA’s and producers or to hand off to inexperienced shooters for fly-on-the-wall productions.

PXW-X70 Teaser Video.

Here’s a short clip to keep you going until later in the week when I will upload the full length version of my video “Dancers on the line” shot with the new Sony PXW-X70 camcorder. As well as the film there will be a behind the scenes video with some insight into what the camera is like to shoot with and how the images look. It’s all good stuff, this is a great little compact handycam and a pretty big step up from the AX100.

Frame grab from the PXW-X70.

It has a nice big 1″ size sensor, built in ND filters and a nice power zoom lens. It records XAVC long GOP 10bit 422 at 50Mbps at up to 60fps. Also has AVCHD and standard definition DV. The ergonomics are brilliant, clearly Sony have done a lot of works on this area and it a delight to operate run and gun or when your pressed for time. You get great battery life and the pictures are pretty amazing for a compact handycam. You can even dial in your own picture profiles for a custom look. Dual SD card slots allow for relay recording or dual card recording, there’s an full size SDI and HDMI out too. LAst thing for now… it’s 4K ready. There will be a paid upgrade to 4K option in the first half of next year. More details to come as the week progresses.

Here’s the press release from Sony.

Basingstoke, July 29, 2014: Sony has today launched the 4K-ready PXW-X70, the first compact XDCAM professional camcorder ever produced. Expanding the popular file-based XDCAM family to a new smaller form factor and lower price point, Sony has combined stunning picture quality, speed of shooting and robust performance into a package which is ideal for a wide range of applications from news gathering and documentary to events work.??

The PXW-X70 features a 1.0 type Exmor® R CMOS Sensor with a resolution of 20 megapixels. The sensor, which is even larger than the Super 16mm film frame, delivers high resolution and fantastic low light performance, as well as offering more depth of field control as demanded by today’s diverse shooting requirements. The new camcorder has the ability to record High Definition in XAVC Long GOP, enabling 422 10-bit sampling at 50 Mbit/s. This in-turn supports a broadcast-quality workflow, increasingly adopted by productions in many different professional applications.

This addition to the expanding next generation XDCAM family follows the recently announced PXW-X180 and PXW-X160 and builds upon Sony’s successful heritage of compact professional camcorders. The PXW-X70 is the first professional compact camcorder from Sony to include Wi-Fi-enabled control via Smart Phone or Tablet using the Content Browser Mobile application. An upcoming release will also provide customers with the ability to upgrade the PXW-X70 to record in 4K Ultra High Definition, with file transferring, and live video streaming capabilities.

“This first compact member of the XDCAM family brings the performance and workflow benefits associated with XAVC to an even wider range of shooting scenarios,” said Robbie Fleming, Product Marketing Manager, at Sony Professional Solutions Europe. “Over the past couple of years we’ve seen the broadcast industry really embrace the picture quality benefits associated with large sensors; the one-inch sensor at the heart of the PXW-X70 sets a new standard for colour, depth and texture in a professional compact camcorder. Coupled with the ability to upgrade to 4K, this represents a multipurpose, future-proof option for customers looking for a tough camcorder which doesn’t compromise on image.”

Key features of the PXW-X70

• 1.0 type Exmor® R CMOS Sensor and Carl Zeiss Vario Sonnar T* lens for stunning picture quality. High sensitivity and fantastic resolution with 14.2 million effective pixels delivers striking detail and colours, even in low light conditions. The lens offers a 12x Optical Zoom, which can be increased to 24x with Clear Image Zoom while retaining full resolution thanks to Super Resolution Technology. Zoom performance can be doubled at any point with a Digital Extender by up to 48x.

• Compact, lightweight XDCAM camcorder packed with adaptable professional functions. The PXW-X70 weighs less than 1.4kg, including the XLR handle unit, battery (NP-FV70), lens hood and large eye-cup. It offers professional interfaces such as 3G-SDI and HDMI output connectors plus an XLR x 2 handle unit with zoom lever. Other professional features include a manual lens ring that can intuitively control zoom and focus, ergonomic palm grip with large zoom lever, two SD memory card slots for backup, simultaneous and relay recording, and a three-level switchable ND filter.

• Breadth of recording format capabilities. Provides multiple choices depending on application required, including XAVC, AVCHD and DV® file-based recording. When recording in XAVC, the PXW-X70 uses the MXF file format, efficiently compressing full HD (1920 x 1080) resolution using the MPEG-4 AVC/H.264 CODEC. Image sampling is 4:2:2 10-bit with high-efficiency Long-GOP compression at 50 Mbps, 35 Mbps or 25 Mbps.

• Built-in Wi-Fi control functionality for monitoring and remote control versatility. Near Field Communication functions enable easy, one-touch wireless LAN connection to a smartphone or tablet, while the Content Browser Mobile application allows confirmation of shot angles and operation of the camcorder by remote, including field angle setting, spot focus and iris adjustment.

• Upcoming announcements to add even greater, future-proof functionality. Sony is set to make upgrades to 4K and file transfer and streaming by Wi-Fi function available for the PXW-X70 in the coming months.

SLR Magic 1.33x Anamorphot, anamorphic lens adapter.

SLR Magic Anamorphot.

I’ve been playing with an SLR Magic Anamorphot. This is a high quality lens adapter that allows you to shoot in the 2.35:1 aspect ratio with a conventional 16:9 camera. The adapter screws on to the front of existing lenses and squashes the scene horizontally by 33% as you shoot. Then in post you squash the image vertically by the same amount and the end result is 2.35:1 aspect ratio footage.

There are some limitations and these are covered in the video, so please watch the video for a full explanation as well as some sample footage. For the money it’s a great way to get low cost anamorphic shots. As well as the aspect ratio change you get really nice horizontal blue lens flares giving you that JJ Abrams look to your productions. Really looking forward to trying it on my A7S once that arrives.

Sony’s Professional Hard Drives.

Sony 256GB SSD.
Sony 256GB SSD.

Hard drives are boring! But they are now a very important part of life in the world of TV production. I get through dozens and dozens of hard drives every year and as the drives I am using may hold footage that can never be replaced it’s important that they are as reliable as possible. For a while now I have been using a number of Sony hard drives and SSD’s. These drives are built for portable video applications and my drives have been all over the world from hot, humid Asia to the bitter cold of Arctic Norway. They have never let me down. Each drive comes in a nice case that resembles a video cassette case so that you can stack them neatly on a shelf. No more tatty, crumpling cardboard boxes. In addition the outer case protects the drive in transit, plus each case contains a USB3 lead and a firewire 800 cable, so you don’t need to search around for the cables.

The drives themselves are built in to a tough but very lightweight enclosure with soft rubber bumpers at each end. There are little notches and bumps in the bumpers that interlock if you stack the drives one on top of another, say on the desk of your edit suite. Not only do the rubber bumpers protect the drives from knocks and bumps, but they also incorporate flaps that cover the USB3 and Firewire 800 sockets. The drives meet the MIL-STD-810G standard and when the connector covers are closed are dust proof to IP5X and splash proof to IP4X. The HDD is built to withstand being dropped from 2m and the SSD from 2.3m. I have to say that my 256GB SSD has been dropped a few times now and is still going strong.

Sony are so confident of the quality of their drives that they offer a 3 year warranty and  after almost a year on the market, I have been told that so far not one single drive has had to be replaced!

USB3 is backwards compatible with USB2, so if you don’t have USB3 you can just treat the drive as a USB2 drive. If you are a Mac user with an older Mac then you are well catered for with a pair of Firewire 800 ports on the rear of each drive.

The 256GB SSD is extremely fast and this drive has become my go-to drive for on the road use as I can easily edit 4K material stored on this drive and it appears to be really tough. I often ship my SSD along with my hold baggage when I’m flying, it’s been bashed about on snow scooters and used to edit from while bouncing down dirt track roads. I use the 500GB and 1TB Hard drives for general purpose storage and HD editing.

For more information take a look at the Sony web site: http://www.sony.co.uk/pro/products/broadcast-products-portable-storage


Quick tips for shooting lightning – Video and Stills.

At night we shoot lightning!

With the UK set to see a couple of days of strong and severe thunderstorms I thought I would put together a very quick guide to shooting lightning with both stills cameras and video cameras. Your first issue will be finding somewhere dry to shoot from, you don’t want rain on your camera or lens. You also do need to consider safety. Lightning is dangerous, it can strike many miles from a thunderstorm. If you can hear thunder you are in the strike risk area, so do take care. One of the safest places to be in a thunderstorm is inside a car. If the car is struck the electricity will pass through the body of the car and not through the occupants, before jumping from the underside of the car to the ground. If you are shooting from a car stay inside the car, don’t sit with your feet out of the door or any part of you touching the ground. Don’t sit in the car while holding on to a camera on a tripod outside the car. Don’t stand under trees, they can explode when struck by lightning, don’t stand on the very top of a hill. Use your common sense.

Arizona Lightning. FS700, 240fps and Zunow E mount 11-16mm T2.8
Long exposure captures great nigh time lightning.

For either stills or video you’re really going to want to use a tripod to get the very best results. As you often get strong winds around thunderstorms you want a good stable tripod. If it is windy keep a close eye on the camera and tripod, you don’t want it blown over by a strong gust of wind.

A wide angle lens will increase your chances of getting a lightning bolt in your shot, but the wider the shot the less detail you will see in the lightning bolt. You can always crop in to a wide shot a bit if it’s too wide. I like to have something in the foreground to give some interest to the image, but try to avoid too many obstructions to the skyline as these will block your view of the lightning.

NIGHT FOCUS:

This is probably the easiest for still photos, but it has many challenges. One is focus as it’s hard to focus on a brief flash of lightning. You will need to use manual focus, autofocus will not work. Start by focussing on a very distant object, perhaps lights on the horizon, the moon, stars or any other VERY distant object, preferably a mile or more away. Then check and double check your focus. Lightning is very fine and if it’s out of focus it will ruin the shot. If you don’t have anything to focus on set the lens to infinity, the sideways “8” symbol is infinity and there will normally be a line to mark the point of infinity focus. Infinity is often NOT at the very end of the lenses focus travel so check for the proper infinity mark. By the way, take a torch/flashlight if your going out in the dark!

STILL PHOTO’s or DSLR AT NIGHT:

You will need to use a tripod. If you have a cable release or other electronic shutter release use it to trigger the camera to prevent shaking the camera as you will need to use a long exposure. As you will be using a long exposure you want to use a low ISO. I typically use 200ISO with an exposure of between 10 and 30 seconds depending on the frequency of the lightning and how bright the surrounding area is. If you are in a town or city with lots of street light you will probably need to use a shorter exposure, maybe 10 to 15 seconds. Out in the countryside you might be able to use 20 to 30 seconds. For the aperture you don’t want super shallow depth of field as this will show up any focus errors, so don’t use your lens wide open. I normally use somewhere around f4 to f8, so f5.6 is probably a good starting point. Take some test shots and check that you are not over exposed.

As a starting point try: 200ISO, f5.6, 10 second exposures, manual focus.

Once the camera is set, it simply a case of snapping away taking pictures until you get lucky and capture one in the frame. It takes a bit of luck and patience, but don’t give up too soon, just keep snapping away. You can just delete all the no good shots later.

Evening thunderstorm in Tucson, Arizona

DAY and NIGHT VIDEO:

If your camcorder has a CMOS sensor (as most do these days) you want to use the slowest shutter speed that you can get away with. If you can control the shutter manually turn it off or reduce it to 1/25 or 1/30. This will reduce the likelihood of you getting lightning bolts that only go half way down the screen, an effect know as “rolling shutter” or “flash band”. If shooting after dark, if you have a camera with full manual control then instead of shooting at the usual 24, 25 or 30 frames per second, consider shooting at half of this, perhaps at 12, 12.5 or 15 frames per second (S&Q motion, slow shutter etc), again with the shutter set to OFF. While this does mean that the motion in your final video will be sped up it almost guarantees that you won’t get any rolling shutter issues. You will need to have the camera on a tripod if doing this to prevent excessive image blur from movement of the camera. The slightly sped up video can also give the pleasing (but fake) impression that the lightning is more frequent than it really is making your shots more dramtic. If you don’t want this simply play the video back at half speed.

STILL PHOTOS DURING THE DAY:

This is really tough unless you have special equipment. You can’t use a long exposure as you would at night because the bright daytime light will wash out the lightning bolts.

Very often a lightning bolt is made up of several flashes in rapid succession. If you do have fast enough reactions and a fast enough camera, you can get the secondary flashes. You will need to use manual focus and manual exposure so there isn’t a delay while the  camera thinks about focus and exposure which delays the release of the shutter. Use a tripod with a cable release or remote shutter and use a longish exposure, 1/30th or 1/15th as there can be up to 1/10th of a second delay between flashes and there could be multiple flashes, you don’t want too fast a shutter speed. Set your focus on a very distant object, use a low ISO, again I typically use 100 or 200 ISO. Shoot a couple of test images and set the aperture so that you have a very slightly underexposed shot, may -1EV to -1.5EV, the slightly darker overall image will help the bright lightning show up better. Then it’s just a case of pointing the camera at the storm on a tripod, with your finger on the trigger and try to hit that shutter release as soon as you see any lightning. I find it’s better to not look through the viewfinder, just look in the direction the camera is pointed. You may be lucky, maybe not, a lot will depend on the type of lightning in the storm and your reaction speed. A better way is to use a dedicated lightning trigger such as a Patchmaster: http://www.fotokonijnenberg.nl/patchmaster. This will trigger the camera electronically if it detects any lightning. It’s MUCH faster and can react much quicker than any human, but it still has some lag time so even a lightning trigger won’t capture every bolt.

A final daytime method is to use an adaptation of the night time DSLR method. If you add a strong ND filter a small aperture around f16 and use a low ISO you may be able to get an acceptable long exposure during daytime, perhaps a couple of seconds. Then set the camera to take photo’s continuously (so when you hold the shutter button down the camera will take one photo after another). By locking down a remote shutter release the camera will take a continuous stream of photos with only a very minimal gap between each picture taken. So you have a high likely hood of capturing any lightning bolts, but you will also end up with a lot of pictures that don’t have any lightning in them. You can either discard these empty frames or use all the frames to create a time-lapse video of the storm.

Have fun, stay safe.

If you find the guide useful, please consider buying me a beer or a coffee.


Type


Lastolite EzyBalance Calibration Card – Pop-up grey card and 90% white card. Review.

Lastolite EzyBalance pop up grey card.

Fed up with carrying large or bulky grey cards that get bent and creased or get dirty and fade? Why not try one of the great Lastolite pop up grey cards? I have the 30cm 18% grey pop-up grey card and it works really well. When folded it’s only about 12cm across so takes no space at all. It comes in a handy zip up case. This is so much easier to carry and transport than traditional ridged cards. The back of the target is 90% white. Both the grey and white targets appear to be very accurate and the matte surface of the grey card helps eliminate hot spots and reflections. There is a cross hair style focussing target in the center of each side if you need to check focus. They come in different sizes, if you want a larger one there are also 50cm and 75cm versions plus there is even an underwater version. Do note that they come in both 18% and 12% shades of grey. Really handy if shooting with SLog or for setting white balance. If you are working with a video camera you want the 18% grey version, but you may need the 12% version if calibrating a light meter etc. Simple, low cost item that works really well. Recommended!

http://www.lastolite.co.uk/ezybalance-grey-wht-card-03m-lllr1250